Welcome to my blog!
It's all about whimsy, art and Halloween!

Friday, June 18, 2010

Sweetie

This is Sweetie.  She's a handmade clay whistle.
Each whistle begins as a hollow ball.  To achieve that, you make two pinch pots and join them together.  After the ball dries a bit so that it's firm, but malleable, it can be shaped and smoothed.  I like to carve, stamp and finish the details before cutting the hole and adding the whistle mouth piece.
When the piece is dry it can be fired.  The firing turns the clay to the consistency of an unglazed flower pot.  Now, I don't mind glazing, but I prefer the process of wax resist.  I color on the pottery with crayons, then I paint the whole thing with brown or black acrylic paint.  The paint wipes off the waxy part and soaks in the parts that aren't waxy.  Next they heat in the oven to evaporate the wax (the color remains).  I finish the piece with colored pencil highlights.
Each whistle has a unique sound and different breath pressure to achieve the sound.  If I were an expert whistle carver, I'd be able to control those things, but it is what it is.   Sweetie's whistle sounds like a Ghost Train when blown at a medium pressure.

Saturday, June 5, 2010

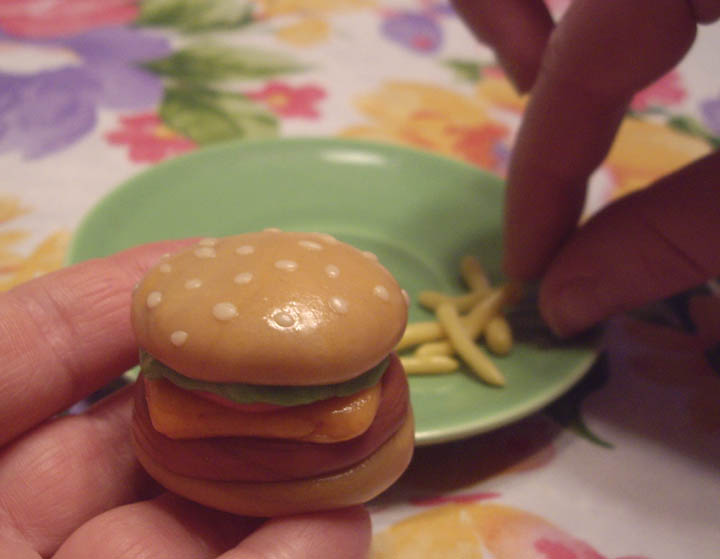
The Tootsie Roll Cheesburger

This is a Tootsie Roll sculpture
The little fruit flavored ones come in lemon, cherry, orange, lime and vanilla.  And, of course, there's the traditional chocolate.  They require some kneading before they can be mixed for color blending and shaping. For the bun I mixed one vanilla, two lemon and half of a chocolate. The meat is one cherry and half of a chocolate.  Those are the only color blended pieces, the rest are the candy's true colors.
You can do a lot with them, but they tend to stay soft, so smaller sculptures are best. 

And what could be better than sharing  cheeseburger and fries with a friend!

Monday, May 24, 2010

Fairies in My Garden

Caught these guys this morning.
They were all kinds of pesky!  Now I'm afraid to let them out!

Monday, May 3, 2010

Colorful,Over-the-Top, Scary Door

Here's my C4 Challenge for April.  Click here to read what the challenge was.
It's clay decorated with crayon (wax resist) and burnt umber acrylic.T he door knob is a crystal bead from my grandmother's broken jewelry collection sitting on a spacer bead backed by a rectangle of copper sheeting.

Thursday, April 1, 2010

Clay Whistles

So, I've been spending a lot of time in my studio making clay whistles.  I'm flying back to Maryland in June to help teach a kid's clay camp with my bff Lynn.  We decided one of the projects would be a whistle.  Neither of us had made one, we just thought it would be a fun thing for the kids to make.  We both went online and watched youtube videos about making clay whistles.  We tried it and both of us were successful...the first time.  When we tried a few more it was less so.  Lynn got the process fairly quickly after a few tries.  I spent many torturous hours slaving over my little skulls, trying to get them to whistle.
I'm getting better at it.  And now I would like to introduce to you some of my favorites!
Sweetie, Frida and Betty.
Harley, Fool and Pete.
Bone Guy and Mack.
There will be more.  Oh yes, there will be more...Moohooahhahhahh!

Thursday, March 11, 2010

Candace's Green Sleeve

If you know me, you know I love coffee and Starbucks is a frequent haunt. Last week I was there with my husband. I was mulling over my options for the Green C4 Challenge and playing with the sleeve when I slipped my hand through it and thought it made make a cool bracelet.
So it began.

I've done a few things with coffee logos (yes, I collect coffee logos and photos) and really wanted to punch this up, so I got out my glittery gel pens and Glossy Accents.
I loved the the outcome!

You'll notice I flattened it for the Glossy Accents application. It will stay where you put it if it's applied to a flat surface. The coffee sleeves are made with 60% post consumer recyled material, so I was already pretty green. Then I got out the pieces of broken costume jewelry that my grandmother saved (along with the buttons off of everything she ever wore...sweet!) and made some decisions.


I gathered the green, pink and pearl beads, a hole punch, a lovely corner punch. stretchy beading string (I wanted it to be able to stretch and not tear when I put it on) and scissors. I punched a pattern of holes and started beading. I overlapped the back and corner-punched the top outer corner.

I cut wavy edges and added a few more sparkly spots.


I really should have slipped it on before I atached the ends together, because it's too big for a bracelet, but it's an awesome coffee sleeve!


Thursday, February 18, 2010

Tiki Woman

Tiki Woman is a self portrait.  I love tikis!  there's actually a tiki magazine!  I bought it when I was in Hawaii.  I fell in love with the very cool tiki drawings of an artist called Thor.  My tiki woman likes drawing in her jammies.