Welcome to my blog!
It's all about whimsy, art and Halloween!

Sunday, December 23, 2012

The 12th Day of Creepmas

On the 12th day of Creepmas my true love gave to me The Jewel of Creepmas.  Oh, this has been so much fun!  I'd like to thank you for all the wonderful comments and wish you a very merry Creepmas!

If you're hopping, you've arrived here from the very awesome Ike's World.

My project is below the blog roll.  Be sure to visit all the creepy bloggers and leave some comment love!


Blog Roll
Susan S.

A while back I did a video for Cool2Craft TV where I was a Gypsy fortune teller and I made my own "Tarot" cards.  This is my original Muse card done up for Creepmas.  I added the SI digi wings from the Quoth the Raven set, the jewels and skulls that I made.  Below is the original and a blank for you to design your own!
  Now, off to the lovely Lisa Hall for some more fabulous fun!

Thursday, December 20, 2012

On the 11th Day of Creepmas We Flew Away

On the 11th day of  the Smeared and Smudged 12 Days of Creepmas blog hop, my true love gave to me the end of world as we know it, and I feel fine!

If you're hopping, you've arrived here from the very awesome Ike's World.

My project is below the blog roll.  Be sure to visit all the creepy bloggers and leave some comment love!


Blog Roll
So, with the end of the world being on the 21st, I'm taking my skull-studded tree and my SI Candy is Dandy Bear and we'll fly away.

The main photo was a fun group project.  Back in Maryland I belonged to a group of four creative mavens.  We would take turns hosting the group for lunch and crafting. For one of my parties,  we took turns dressing in a long black dress I had.  Each in turn would sit on the edge of a table with a broom under us.  They had no idea what I was up to!
Here is how the photos started at.  This is me.  You may notice that I changed a few things in the finished photo.  Not just adding the background,  I shaved several pounds off, cut the skirt at an angle to imply movement and added a scarf.  This can also be achieved by fussy cutting the body to how you want it to look.

If you're doing your layered photo, you would print at least two of the body so that the arm can be around the little bear (or your favorite familiar).  I use a 100 year-old Photoshop program to edit the photos, but cutting and layering is just as fun with endless possibilities!

Now, off to the lovely Lisa Hall for some more fabulous fun!

Tuesday, December 18, 2012

Welcome Santa on the 10th Day of Creepmas

On the 10th day of Creepmas, we welcomed Santa into our home!  In case this is your first visit to The Smeared and Smudged 12 Days of Creepmas blog hop,  click in here for all the skinny

If you're hopping, you've arrived here from the very awesome Ike's World.

My project is below the blog roll.  Be sure to visit all the creepy bloggers and leave some comment love!


Blog Roll
One year when we were adding on to our house in Maryland, we had a big honking plywood wall in the living room.  I challenged my 20 year-old son to paint a Christmas scene and make stockings for us.  We talked about masking, sponging, blending and perspective.
This is what  he came up with.  Ah, yes.  He is my son.  I added the digi crow from SI's Quoth the Raven digi set.  He's one of my favorites!
Now, off to the lovely Lisa Hall for some more fabulous fun!

Sunday, December 16, 2012

On the 9th Day of Creepmas my true love gave to me 9 Ginger-Fred Men

On the 9th day of Creepmas Smeared and Smudged blog hop my true love gave to me a handmade cookie cutter in the shape of Freddy Krueger!  Don't you just love all the fabulous projects all the bloggers have created for the hop?  In case this is your first visit to The Smeared and Smudged 12 Days of Creepmas blog hop,  click in here for all the skinny

If you're hopping, you've arrived here from the very awesome Ike's World.

My project is below the blog roll.  Be sure to visit all the creepy bloggers and leave some comment love!


Blog Roll
Susan S.
So, my bestie, Lynn, sent me a make-your-own-cookie-cutter kit.  I was waiting for just the right idea to pop into my head and this week it did.  My daughter's birthday.  She loves the Freddy franchise!  I Googled images of the character and drew what I thought would be viable as a cutter.  I've been making cut out cookies forever and I knew it couldn't be too detailed.
I got the kit out and dove in.  First you cut a long piece of string and lay it on the out line to measure how much metal you'll need, then add 1".
Use the shaping tools that come with the kit to form the shape, comparing the metal to the drawing after each bend.  
Make sure that you have an overlap of metal to glue together.  The kit provides an adhesive tape, but you could certainly use a metal glue and clamp it.
Then I drew out what I thought might work for the iced ginger-Fred cookie.
Here's my Ginger-Fred rhyme, it went on the front of her card:
One, two
Ginger-Fred is coming for you
Three, four
Open the oven door
Five, six
Now the timer ticks
Seven, eight
Put him on a plate
Nine, ten
Bake more Ginger-Fred Men
Ginger-Fred was inside the card saying
"Dream a sweet little dream with me"
My daughter was thrilled.  It was totally worth it!

Here's a link to a very crafty lady at Suburbia Soup who came up with her very own way to make cookie cutters without a kit.  I love her zombie!

Now, off to the lovely Lisa Hall for some more fabulous fun!


Friday, December 14, 2012

A Clay Skull for the 8th Day of Creepmas

On the 8th day of Creepmas Smeared and Smudged blog hop my true love gave to me a Clay Skull full of pumpkin seeds!  Don't you just love all the fabulous projects all the bloggers have created for the hop?  In case this is your first visit to The Smeared and Smudged 12 Days of Creepmas blog hop,  click in here for all the skinny

If you're hopping, you've arrived here from the very awesome Ike's World.

My project is below the blog roll.  Be sure to visit all the creepy bloggers and leave some comment love!


Blog Roll

Okay, maybe it's not creepy, but it is fun!
 Now, off to the lovely Lisa Hall for some more fabulous fun!

Wednesday, December 12, 2012

A Dia de los Muertos Angel on the 7th Day of Creepmas

On the 7th day of Creepmas Smeared and Smudged blog hop my true love gave to me a Dia de los Muertos Doggy ornament!  Don't you just love all the fabulous projects all the bloggers have created for the hop?  In case this is your first visit to The Smeared and Smudged 12 Days of Creepmas blog hop,  click in here for all the skinny

If you're hopping, you've arrived here from the very awesome Ike's World.

My project is below the blog roll.  Be sure to visit all the creepy bloggers and leave some comment love!


Blog Roll
Susan S.

This little guy is made from polymer clay, black paint, glitter and wire.  The steps are so easy.  I want to refer you to Cool2Craft for the tutorial and video.  That project is assembled in the same way.  
You'll need white clay for this version.  
Assemble the dog and make joint marks.
Bake according to the directions and allow to cool.

 Paint with black acrylic and quickly remove the paint from all but the recesses.

Add the jewel eyes and tie a ribbon just under the halo.

 Now, off to the lovely Lisa Hall for some more fabulous fun!

Monday, December 10, 2012

Day 6 of 12 Days of Creepmas

On the 6th day of Creepmas Smeared and Smudged blog hop my true love gave to me a giant zombie plastic ornament!  Don't you just love all the fabulous projects all the bloggers have created for the hop?  In case this is your first visit to The Smeared and Smudged 12 Days of Creepmas blog hop,  click in here for all the skinny

If you're hopping, you've arrived here from the very awesome Ike's World.

My project is below the blog roll.  Be sure to visit all the creepy bloggers and leave some comment love!


Blog Roll
So I bought this fabulous plastic ornament box full of colorful ornaments last year knowing I would want to make something cool with it.  

I spread some Aleene's Snow in the bottom and half way up the back then sprinkled glitter in it.

Near the top of the snow, I pushed a cemetery silhouette into the snow.  It's by Alpha Stamps.
I put one of my little polymer clay zombies in the  middle of the snow and added a tombstone button behind him.  He looks a bit miffed.  I should probably seal him in there!

I perched a crow on the top from SI's Quoth the Raven digi set.

 Now, off to the lovely Lisa Hall for some more fabulous fun!

Sunday, December 9, 2012

Day 5 of 12 Days of Creepmas Blog Hop - Easy Skelly Cookies


On the 5th day of Creepmas Smeared and Smudged blog hop my true love gave to me a Nightmare Before Christmas party!  Don't you just love all the fabulous projects all the bloggers have created for the hop?  In case this is your first visit to The Smeared and Smudged 12 Days of Creepmas blog hop,  click in here for all the skinny

If you're hopping, you've arrived here from the very awesome Ike's World.

My project is below the blog roll.  Be sure to visit all the creepy bloggers and leave some comment love!


Blog Roll

Four months ago my grand nieces and nephews and I started a tradition of having one creative party every month.  Each kid gets to host one in turn.  They choose a theme, create the dinner menu, create an invitation (if they want to) and choose a craft.  It's up to them to decide how much they want to do.  At the very least, they choose a theme and a craft idea that I flesh out.  AND they get to sit in the big craft chair in the studio at the party (they really like that part).

They youngest kidlet wanted a Nightmare Before Christmas party and you can guess how excited I was!  He wanted chicken nuggets and fries for dinner and skull cookies for dessert.  Oh, and Dr Pepper.  The parents come for dinner too, so Hubby gets to augment the menu for them.  I say "gets to" because he loves to cook for people.  
The craft was a paper skull.  That left me a lot of leeway.  I managed to find free Nightmare Before Christmas coloring pages (though I question the validity of said FREE pages because Disney owns the images, therefore I won't show them).  We made ornaments using Jack's head, his bat bow tie and  a bell.  I printed both images forward and backward, so they could be put back to back.  They colored the images with glittery gel pens, cut them out and glued them together with the ribbon between. 

On to the cookies!  I use Wilton's Roll Out Cookie Recipe, with the exception that I used their older recipe that called for 1 cup of sugar.  I cut them out with the rim of a cup.  When they were cooled, I iced them with melted white chocolate.  Your just pour it on and shake the cookie to spread it.  I found a Wilton Cookie Icing in black on sale, so that's what I used for the space.  Now, the Cookie Icing is on the wet side and spreads a lot, so the key is to squeeze on a little at a time for the eyes, touch the tip to the cookie without squeezing for the nostrils and move quickly across the cookie, without touching it. for the mouth.  Use a tooth pick to draw across the mouth for the detail.  

The most important thing is to get into a rhythm and not worry about making each one perfect.  Make a few extra for practice.  Enjoy!


 Now, off to the lovely Lisa Hall for some more fabulous fun!

    

Thursday, December 6, 2012

A Very Scary Merry Creepmas

Well it's day 4 of the 12 Days of Creepmas Smeared and Smudged blog hop!  Can you believe all the fabulous projects all the bloggers have created?  In case this is your first visit to The Smeared and Smudged 12 Days of Creepmas blog hop,  click in here for all the skinny

If you're hopping, you've arrived here from the very awesome Ike's World.

My project is below the blog roll.  Be sure to visit all the creepy bloggers and leave some comment love!


Blog Roll
Susan S.
My offering today is a digi card.   I drew the words that were inspired by a popular holiday image (I was not able to find an original source for it, so I won't show it, but, if you've seen it, you'll know right away the one I'm referring to).  I scanned the drawing and added dimension to it in Photoshop.

The ravens and skull are digis from Smeared Ink called Quoth the Raven and I saved the frame from a greeting card and scanned it.

Now, off to the lovely Lisa Hall for some more fabulous fun!

Tuesday, December 4, 2012

Day 3 of The 12 Days of Creepmas - Button Skull Wreath


Eek!  Run screaming!  It's the 12 days of Creepmas!  The Christmas blog hop that's all about the creep factor.  I just know you're terrified by the partial image above, but, in case this is your first visit to The Smeared and Smudged 12 Days of Creepmas blog hop,  click in here for all the skinny

If you're hopping, you've arrived here from the very awesome Ike's World.

My project is below the blog roll.  Be sure to visit all the creepy bloggers and leave some comment love!


Blog Roll


I love button art!  I've been wanting to try it so here's what I did - I chose the eyes and nose and built the skull around them.  I gathered all the green buttons I had for the wreath and red accent buttons for the bow and berries.


The spider webs are one of my favorite SI stamps from the Candy is Dandy digi set.  I added them in Photoshop.  I'm loving it!

Now, off to Lisa Hall for some more fabulous fun!


Sunday, December 2, 2012

Day 2 of The 12 Days of Creepmas - An Ill Tempered Snowman

It's the 12 days of Creepmas!  The Christmas blog hop that's all about the creep factor.  Yes, Smeared and Smudged is at it again and I'm all in!  Check in here for all the skinny

If you're hopping, you've arrived here from the very awesome Ike's World.

My project is below the blog roll.  Be sure to visit all the creepy bloggers and leave some comment love!


Blog Roll
Steph
Susan S.


Yes, this bad boy is off his meds...again.  I got the inspiration from an adorable sock snowman on  Then She Made.  She has a great tutorial, so please check it out!  I was thrilled at how quickly and easily it came together.

I stole a sock from Hubby and used one of my Nightmare Before Christmas socks for his little outfit.  I used a 12" length of 20 gauge wire to stick through the rice filled sock for arms and hands.

I used Tulip Beads in a Bottle for the face - Ruby, Onyx and Pearl.

The hat is sporting a Smeared Ink stamp called Flying Skull.  His handlers are coming for him now, so off to Lisa Hall for some more fabulous fun!

Friday, November 30, 2012

12 Days of Creepmas Blog Hop


Yea!  It's finally here!  12 days of Creepmas!  The Christmas blog hop that's all about the creep factor.  Yes, Smeared and Smudged is at it again and I'm all in!  Check in here for all the skinny

If you're hopping, you've arrived here from the very awesome Ike's World.

My project is below the blog roll.  Be sure to visit all the creepy bloggers and leave some comment love!


Blog Roll

Here's my creepy Christmas stocking.  It's kind of a free form thing.  I drew the general shape and cut 2, one in purple and one in a dark, dirty looking red.  
I cut the red one apart and trimmed a little so there would be a narrow space to stitch across.  I glued the red down in the center of each piece.  

I used a small, flat raffia-like thread (called craft thread) for the stitches. I left a an unglued space large enough to insert a glass eye and loosely stitch over it.

The teeth are polymer clay beads.  They were  made a bit quick and loose.  I added some slick paint blood to the roots of the tooth on the toe.  Eek!

The SWEET letters are from Smeared Ink.  I added some green to them in Photoshop and gave the little skull eyes red slick paint dots.


The glass eye is from a set of eyeball wine charms.  I so love them!

Now, on your way to Lisa Hall for some more fabulous fun!

Sunday, November 25, 2012

Paint Chip Pal Christmas Stocking

I’m simply girly-giggly to be a part of the Paint Chip Pals Rainbow-Tastic Holiday blog hop which supports a fun and exciting Kickstarter campaign for 
the Paint Chip Pals plush dolls 
- a colorful set of characters saving the world from blah one color at a time! I have pledged for my very own Paint Chip Pal plush doll not only because they are so fabulously bright and happy but also because I enjoy supporting creative entrepreneurs! 

If you haven’t virtually met The Paint Chip Pals creators - Andrea and Cliff Currie (whom you may recognize from Hand Make My Day and Craft Wars) I urge you to head on over to their Kickstarter campaign and check them out!
Now onto my Paint Chip Pals Rainbow-Tastic Holiday project! Although I enjoy each Paint Chip Pal for their bright hues and unique personalities I naturally honed in on Pururp as the inspiration for my Christmas stocking project because I love her grape big smile and mad karaoke skills!

When I was visualizing my Paint Chip Pals Christmas Stocking, I saw it as the basic shape of a paint chip with an angled, curly toe and shrink plastic Paint Chip Pals dangling from the top.  I got Andrea's permission to print the Paint Chip Pals on inkjet printable shrink plastic.  


I used white felt for the background and went to work adding paint chip layers, funny asymmetrical felt bits and beads and colorful buttons to wrap it all up.


Leave a comment here for a chance to win your very own Paint Chip Pal plushie and don’t forget to check the Rainbow-tastic blog hop at Handmakemyday.com  for more inspiring projects and even more chances to win your very own Paint Chip Pal Plushie! 

Holy canolli! What are you waiting for?

Wednesday, November 14, 2012

Smeared and Smudged Blog Hop

 Welcome to the Smeared and Smudged Forum's November Blog Hop! 
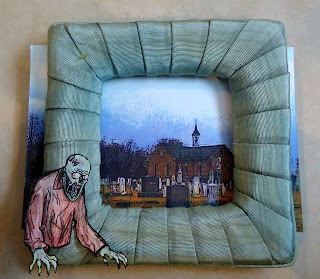
The theme this month is: Alter Something! My contribution is an altered frame called "Need Coffee".  And, of course, I do.

If you're hopping, you should have come here from the lovely and talented Windy.  Be sure to see all the fabulous projects everyone made and leave some comment love.


Blog Roll:

 I started with this old fabric frame that I found going through some old stuff.
 I printed out the SI Half Zombie dude and colored him with pencils.  I used and black pencil to dirty up the fabric a bit.
I cut the zombie out and I inserted a photo of a church and cemetery in Pennsylvania that I took and gave it poster edges in Photoshop.  I used a felt pen to dot the frame.
I slit the right arm of the zombie so I could bring both arms to the outside of the frame.  After he was glued in place I gave his hands, mouth and wounds a glossy sealer.
 I used a felt pen to color the letters.  Last, I glued one of my clay zombie coffee cups.

Now off you go to see Wendy's blog!