Welcome to my blog!
It's all about whimsy, art and Halloween!
Showing posts with label smeared and smudged forum. Show all posts

Tuesday, December 18, 2012

Welcome Santa on the 10th Day of Creepmas

On the 10th day of Creepmas, we welcomed Santa into our home!  In case this is your first visit to The Smeared and Smudged 12 Days of Creepmas blog hop,  click in here for all the skinny

If you're hopping, you've arrived here from the very awesome Ike's World.

My project is below the blog roll.  Be sure to visit all the creepy bloggers and leave some comment love!


Blog Roll
One year when we were adding on to our house in Maryland, we had a big honking plywood wall in the living room.  I challenged my 20 year-old son to paint a Christmas scene and make stockings for us.  We talked about masking, sponging, blending and perspective.
This is what  he came up with.  Ah, yes.  He is my son.  I added the digi crow from SI's Quoth the Raven digi set.  He's one of my favorites!
Now, off to the lovely Lisa Hall for some more fabulous fun!

Sunday, December 9, 2012

Day 5 of 12 Days of Creepmas Blog Hop - Easy Skelly Cookies


On the 5th day of Creepmas Smeared and Smudged blog hop my true love gave to me a Nightmare Before Christmas party!  Don't you just love all the fabulous projects all the bloggers have created for the hop?  In case this is your first visit to The Smeared and Smudged 12 Days of Creepmas blog hop,  click in here for all the skinny

If you're hopping, you've arrived here from the very awesome Ike's World.

My project is below the blog roll.  Be sure to visit all the creepy bloggers and leave some comment love!


Blog Roll

Four months ago my grand nieces and nephews and I started a tradition of having one creative party every month.  Each kid gets to host one in turn.  They choose a theme, create the dinner menu, create an invitation (if they want to) and choose a craft.  It's up to them to decide how much they want to do.  At the very least, they choose a theme and a craft idea that I flesh out.  AND they get to sit in the big craft chair in the studio at the party (they really like that part).

They youngest kidlet wanted a Nightmare Before Christmas party and you can guess how excited I was!  He wanted chicken nuggets and fries for dinner and skull cookies for dessert.  Oh, and Dr Pepper.  The parents come for dinner too, so Hubby gets to augment the menu for them.  I say "gets to" because he loves to cook for people.  
The craft was a paper skull.  That left me a lot of leeway.  I managed to find free Nightmare Before Christmas coloring pages (though I question the validity of said FREE pages because Disney owns the images, therefore I won't show them).  We made ornaments using Jack's head, his bat bow tie and  a bell.  I printed both images forward and backward, so they could be put back to back.  They colored the images with glittery gel pens, cut them out and glued them together with the ribbon between. 

On to the cookies!  I use Wilton's Roll Out Cookie Recipe, with the exception that I used their older recipe that called for 1 cup of sugar.  I cut them out with the rim of a cup.  When they were cooled, I iced them with melted white chocolate.  Your just pour it on and shake the cookie to spread it.  I found a Wilton Cookie Icing in black on sale, so that's what I used for the space.  Now, the Cookie Icing is on the wet side and spreads a lot, so the key is to squeeze on a little at a time for the eyes, touch the tip to the cookie without squeezing for the nostrils and move quickly across the cookie, without touching it. for the mouth.  Use a tooth pick to draw across the mouth for the detail.  

The most important thing is to get into a rhythm and not worry about making each one perfect.  Make a few extra for practice.  Enjoy!


 Now, off to the lovely Lisa Hall for some more fabulous fun!
    

Thursday, December 6, 2012

A Very Scary Merry Creepmas

Well it's day 4 of the 12 Days of Creepmas Smeared and Smudged blog hop!  Can you believe all the fabulous projects all the bloggers have created?  In case this is your first visit to The Smeared and Smudged 12 Days of Creepmas blog hop,  click in here for all the skinny

If you're hopping, you've arrived here from the very awesome Ike's World.

My project is below the blog roll.  Be sure to visit all the creepy bloggers and leave some comment love!


Blog Roll
Susan S.
My offering today is a digi card.   I drew the words that were inspired by a popular holiday image (I was not able to find an original source for it, so I won't show it, but, if you've seen it, you'll know right away the one I'm referring to).  I scanned the drawing and added dimension to it in Photoshop.

The ravens and skull are digis from Smeared Ink called Quoth the Raven and I saved the frame from a greeting card and scanned it.

Now, off to the lovely Lisa Hall for some more fabulous fun!

Sunday, December 2, 2012

Day 2 of The 12 Days of Creepmas - An Ill Tempered Snowman

It's the 12 days of Creepmas!  The Christmas blog hop that's all about the creep factor.  Yes, Smeared and Smudged is at it again and I'm all in!  Check in here for all the skinny

If you're hopping, you've arrived here from the very awesome Ike's World.

My project is below the blog roll.  Be sure to visit all the creepy bloggers and leave some comment love!


Blog Roll
Steph
Susan S.


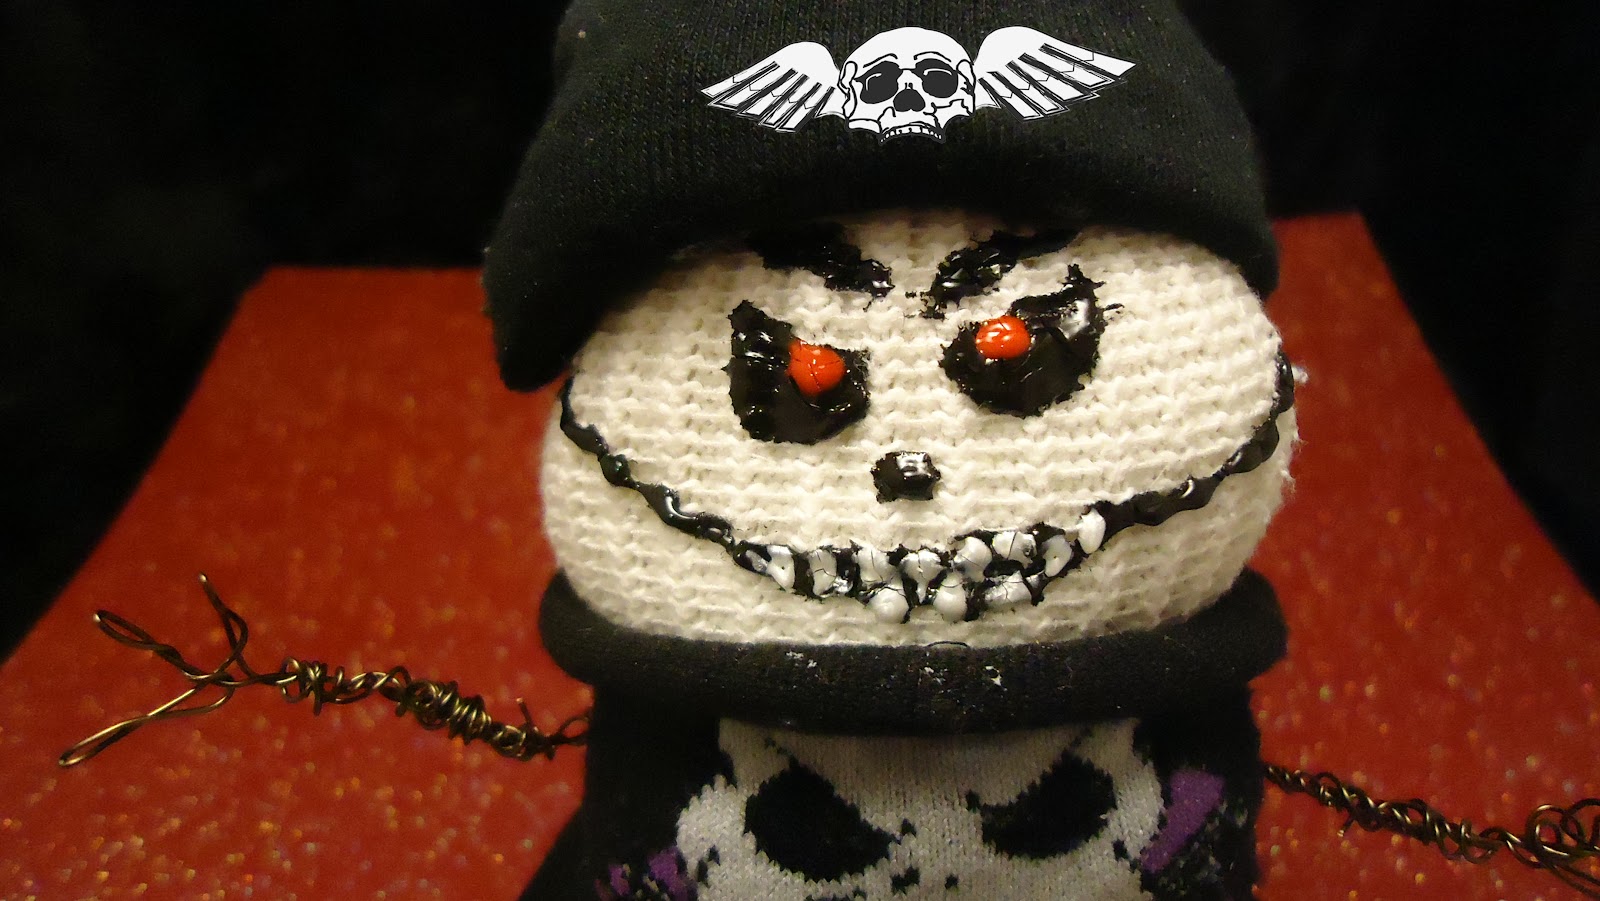
Yes, this bad boy is off his meds...again.  I got the inspiration from an adorable sock snowman on  Then She Made.  She has a great tutorial, so please check it out!  I was thrilled at how quickly and easily it came together.

I stole a sock from Hubby and used one of my Nightmare Before Christmas socks for his little outfit.  I used a 12" length of 20 gauge wire to stick through the rice filled sock for arms and hands.

I used Tulip Beads in a Bottle for the face - Ruby, Onyx and Pearl.

The hat is sporting a Smeared Ink stamp called Flying Skull.  His handlers are coming for him now, so off to Lisa Hall for some more fabulous fun!

Friday, November 30, 2012

12 Days of Creepmas Blog Hop


Yea!  It's finally here!  12 days of Creepmas!  The Christmas blog hop that's all about the creep factor.  Yes, Smeared and Smudged is at it again and I'm all in!  Check in here for all the skinny

If you're hopping, you've arrived here from the very awesome Ike's World.

My project is below the blog roll.  Be sure to visit all the creepy bloggers and leave some comment love!


Blog Roll

Here's my creepy Christmas stocking.  It's kind of a free form thing.  I drew the general shape and cut 2, one in purple and one in a dark, dirty looking red.  
I cut the red one apart and trimmed a little so there would be a narrow space to stitch across.  I glued the red down in the center of each piece.  

I used a small, flat raffia-like thread (called craft thread) for the stitches. I left a an unglued space large enough to insert a glass eye and loosely stitch over it.

The teeth are polymer clay beads.  They were  made a bit quick and loose.  I added some slick paint blood to the roots of the tooth on the toe.  Eek!

The SWEET letters are from Smeared Ink.  I added some green to them in Photoshop and gave the little skull eyes red slick paint dots.


The glass eye is from a set of eyeball wine charms.  I so love them!

Now, on your way to Lisa Hall for some more fabulous fun!

Tuesday, October 30, 2012

31 Days of Halloween - Happy Halloween! Dia de los Muertos Shrine for Conan


Oh my heck!  It's Halloween on the Smeared and Smudged Forum's 31 Days of Halloween Blog Hop! Yea! What a fabulous month!  I love all the wonderful projects that I'm seeing on my daily hops!  Take a bow, Wicked Bloggers!

Below are all the fabulous bloggers:


Dia de los Muertos (Day of the Dead) is a wonderful holiday that celebrates the lives of loved ones who have passed. One of the symbols of the holiday is the sugar skull, usually decorated in bright colors. I wanted to use the sugar skull icon in a shrine for our dog that we lost early in the year, but I did not want them to be the focus.
I punched out skulls from colorful card stock and glittered them in monotones. I started the shrine by covering Conan's bowls with handmade tiles, beads, baubles and all kinds of things that have meaning for our family.
It's not a traditional mosaic process. I glued everything on with hot glue and did not grout. I made a polymer clay sugar skull to add as a finishing touch.
Let's start with that tutorial and go from there.

Materials:
Polymer clay
Mark making tools - needle tool, pencil, craft knife
Glitter in several colors
Glue Black felt pen
Card stick in several bright colors
Skull shaped punch - I used Martha Stewart's Glitter glue in the colors of your card stock Silk flowers in bright colors
Hot glue
I was so happy to find Martha Stewart's Halloween glitter kit!  The little glue bottle has a tiny nozzle - perfect for delicate work.
To make the polymer clay skull - use my shape as a guide. Shape it on your work surface to keep the back flat.
Bake as directed.
Color in the eyes, nose and teeth with the felt pen.
Add tiny dots of glue where you want one color of glitter.
Sprinkle glitter. Tap off excess glitter. Repeat for each color.Allow to dry.
Now for the Dia de los Muertos border:Punch out the skulls.
Outline and make designs with glitter glue the same color as the paper. Allow to dry.
Here are the mosaiced bowls in a dimensional frame. Due to the heaviness of the bowls, I glued and screwed them on the backing.
Alternate silk flowers and skulls all the way around the inside edge.

And there's a rat!


Monday, October 29, 2012

31 Days of Halloween - Day 30 - Make your own glittery pumpkin Buttons


Day 30 and once again you are hopping onto the Smeared and Smudged Forum's 31 Days of Halloween Blog Hop! Yea!  I love all the wonderful projects that I'm seeing on my daily hops!  Take a bow, Wicked Bloggers!

Below are all the fabulous bloggers:

Making your own buttons is a hoot!  These simple pumpkin buttons began as a piece of polymer clay that I shaped, baked and made a mold of. But, you don't even have to make an original piece to begin with, you can make a mold of ANYTHING!  Just think of the possibilities!

Materials: Polymer clay - Orange and scrap clay Mold making medium Crochet needle Wire Round nose pliers Chan nose pliers Wire Cutters Needle tool or toothpick Glue Glitter
Make a small, flat backed pumpkin shape.Use a crochet needle to mark the sections of the pumpkin. You can use scrap clay for this, because this will be the piece you make a mold of. Bake according to directions. Allow to cool.
You will need a mold making medium. THis is a Sculpey product that I like.You'll also need powder and a brush to spread it.
Brush and dab the powder on the original piece.
Push the powdered piece into a ball of mold medium.Turn it over and push a little bit to even the surface.
Very gently pull the mold medium away from the baked piece ever so slightly and push a tiny bit on the back side of the mold medium to release the piece.Bake the mold as directed and allow to cool.
To make the button and shank you'll need orange clay, the baked mold, a water spritzer, 20 gauge wire, round nose pliers and chain nose pliers.
Cut a 1" piece of wire and bend it around the round nose pliers.
Bend both ends out to the side with the chain nose pliers.
Put a bend in both ends keeping the ends level.
Push a small amount of clay into the mold. You may need to adjust the amount of clay. You don't want it to extend beyond the edge and have it be sloppy.
Place the wire on the clay.Press down slightly.
Put a dot of clay over the wire ends.
Smooth the dots the best you can.Turn the mold over and gently push the back to release the clay.
Bake as directed and allow to cool.
Paint the pumpkins with glue and pour glitter on. I held the button with pliers while I glittered. It worked well.Pull through the wet glue in the creases for more depth. Allow to dry.

Saturday, October 27, 2012

31 Days of Halloween - Day 28 - Blinged Out Witch's Hat


And here we are on day 28! Yea!  And you are hopping onto the Smeared and Smudged Forum's 31 Days of Halloween Blog Hop! Yea!  I love all the wonderful projects that I'm seeing on my daily hops!  Take a bow, Wicked Bloggers!

Below are all the fabulous bloggers:


What does every witch need to shine at a Witch's Tea? A fabulous hat! I started with a cool hat I found on line after last year's Witch's Tea, for a huge discount! That was my very first Witches tea and I wore a hooded cloak, which I love, but...there was a best hat contest! Who knew! So, as I said, I started with one that was already cool and had a ball blinging it up!
Materials:
A pointed hat
Hot glue
Feathers
Wire
Beads
Bangles
Knick knacks, doo dads and glitter glue
Here's my cool hat.I love all the black gauze and and bent over point!
You may recognize many of the bling I'm adding as Halloween projects from earlier in the October.This is the first bling - a small bat pendant with a skull bead dangle. I sewed it on to make it easy to switch out for next year's tea.
I cut 6 3" to 4" strips of tulle 36" wide and tied them in a bow.
I hot glued the bow on the back and added this bauble.It's Smeared Ink's It's About Time Pocket Watch stamp glued on the back of a glass blob. I added glitter glue to the tulle.
I glued feathers all the way around and sewed on a pendant piece and added wires that I curled up and attached dangles to.

31 Days of Halloween - Day 27 - Edible Zombie Morsels


Ahh!  It's day 27! That's right, and you are hopping onto the Smeared and Smudged Forum's 31 Days of Halloween Blog Hop! Yea!  I love all the wonderful projects that I'm seeing on my daily hops!  Take a bow, Wicked Bloggers!

Below are all the fabulous bloggers:


Now will come the making of the zombie candy! Muhuhuahahahhhh! No baking required, but you do need clean hands, warm pockets and fruit flavored Tootsie Rolls!
Materials:
Tootsie Roll Fruit Flavors - make sure the mix includes vanilla
Tootsie Rolls take a little time and moderate strength to condition, so the first rule of Tootsie Roll Sculpting is: 
Put the wrapped candies in your pockets for at least half and hour before conditioning it.
 Rule 2:
The Tootsie Roll will pretend it doesn't want to stick to itself at first. After a moment, you won't be able to separate it!
Condition them as you would polymer clay - smooshing and rolling them in your hands until they are soft enough to shape.
For a toe, you will need 2 green, a tiny piece of white, purple and pink.
Combine the 2 green and shape into a cylinder.
Flatten and widen one end.
Roll the purple and fatten it into a circle, place it on the toe and tear the end away to make a gross toenail.
Make a button shape with the white and push it in the back of the toe.
Roll a tiny piece of the pink and lay it around the white.
You can put some pink under the toenail if you like.
For an eyeball, you will need 2 white, 1 pink and a tiny bit of blue.
Combine the 2 white pieces and roll into a ball.
Twist all but a little of the pink to make the root and then roll small strings to to make veins.
Mix a tiny bit of white and blue together to make a hazy looking iris.
For the teeth I used 1 white mixed with 1/2 a yellow for the piece of bone, yellow for the teeth and a bit of pink for the little bit of gums.

The brain bit is a blue and white combined. Make a random lump and roll the rest into a long string to wind back and forth all over the lump.
And there you have it! Zombie Morsels! Oh, and the slogan is:
Zombie Morsels
When you care enough to send the very beast