Welcome to my blog!
It's all about whimsy, art and Halloween!

Tuesday, October 13, 2009

Terrorific Tuesday 2009 Week 2


Another week! Another helping of Halloween goodness. Check out what the fabulous crafters from all walks of life are up to this Terrorific Tuesday for the second week of October!

This little lightLight up the night with this cute pumpkin votive holder from Kat the Fearless Crafter.

Sugar Skull Bracelet & Bats in the Belfry ChokerCandace is having way too much fun with shrink plastic! Check out these fun and charming crafts on the Spirit Clay blog.

Dollar Tree Decorated Lights TutorialCome and decorate some Dollar Tree Skulls with Crafterella, don't forget your sharpie markers!

The Impatient Crafter for iLoveToCreateWhip up a Halloween Invitation that's a real 'hoot' with Madge in this project for iLoveToCreate!

Spooky Halloween CoastersCheryl Ball of Still Crafty After 50 shares some fun, funky, and spirited coasters!

Halloween Treat BowlCreate a fun and festive treat dish with Inspired at Home!

Strands of BeadsMelissa creates a whimsical seasonal necklace based on the theme "pushing up daisies".

Basic Black Box Meets Pumpkin PatchWhip up Halloween favor boxes in minutes with brand new Sizzix ScoreBoard dies.

Mummy MannequinCreate a mummy that will be a memorable accent at your Halloween party with Pattiewack!

Munchkin Mama's Crispy Peanut Butter BallsMunchkin Mama has a great recipe for no bake peanut butter balls that the whole family will want to make!

Witch Parking!!Make a "Witch Parking" sign on the Mucky Finger's blog!

Vintage-Inspired Halloween Tree TopperShannon shows off her new Halloween tree topper, inspired by vintage crepe paper crafts!

The Impatient CrafterMake a whimsical and elegant Halloween necklace with Madge!

Jack-O-Lantern WaterfallsStudio Mama shows you how to make some fun and festive earrings for the Halloween season.

Glow in the Dark JewelryUse glow in the dark polymer clay and rubber stamps to produce eerie Halloween jewelry.

Crafty Chica's Paint Drip Pumpkin!A loca idea on the fly turned out muy fantastico!

Free Printable Halloween Cup SleevesYou’ll be a hit with these labels for hot beverages at your Halloween party.

Scarecow SweatshirtSharron Westerfield shares a cute scarecrow sweatshirt she made from a fun downloadable pattern from Janome!

Halloween Ribbon Brooches and FascinatorsAlexa Westerfield a.k.a. Swelldesigner whips some quick and cute Halloween accessories!

R.I.P. Skeleton in CoffinGuarantee a spooktacular Halloween Party with a skeleton in a coffin treat filled centerpiece!

Happy October KewpiesFind inspiration in this colorful and cute candy corn Kewpie photo from Boopsie Daisy!If you would like to join in the fun next week, e-mail Alexa at swelldesigner@yahoo.com and put in your subject line "Terrorific Tuesday". She'll get you added to the group!

Sunday, October 11, 2009

Sugar Skull Bracelet and Bats in the Belfry Choker

Supplies
1 pack of assorted shrink plastic, including white and black
scissors
Dowel (about 1/4 inch) or other instrument to wrap wire around
Fine point permanent markers - black, pink, orange, green & purple
Stretchy beading string
Needle nose pliers
Colorful seed beads
Assorted beads you might want on your bracelet
Pewter cross charm
24 Gauge wire, any color
Hole punch
Acrylic spray sealer

For the Bats in the Belfry Choker you will want to add these as well


Opaque gel pens - white and any color you want for the bat's eyes
Orange and purple narrow ribbon
Narrow black cord

Shrink plastic is a wonderful medium for turning hand drawn elements into jewelry. I love the holiday Day of the Dead! It happens around Halloween, but it's a celebration of ancestry. I'm so inspired by the colors and imagery. The humorous skeletons represent our loved ones doing the things they loved to do in life. Sugar skulls are a popular treat. This project was designed to honor the artistic and spiritual women in my family line. Below are a couple of ceramic skulls I've made.

I used white shrink plastic for the skull charms and punched them out with Martha Stewart's skull punch (you can freehand skulls and cut them out yourself if you prefer - more about that below). I used fine tip permanent markers to make a design that I drew on both sides of all seven skulls. I only used five skulls for the bracelet, I saved two to make earrings. So let's get started!
Create your sugar skull design and bake the shrink plastic according to the directions. Don't forget to punch a hole in each skull BEFORE baking. After baking, protect your designs by spraying the skulls with a sealer
To turn the skulls into charms, you'll want to do some wire wrapping. The wrapping I do for bracelets is fairly large so the charms will move easily. Start with about six inches of 24 gauge wire (any color), wrap twice around a 1/4 inch dowel (or anything you can find that's about that diameter - I used a chopstick). Twist to secure. Slide the double loop off the dowel.
Beginning close to the double loop, wrap the wire around once and slide it off the dowel without twisting.
Pick out some colorful seed beads and slip three or four on the open loop. Slide a skull onto the loop and add three or four more beads onto the loop (you can use more or less if it suits your fancy). Put the loop back on the dowel (this helps your loop keep it's shape) and twist.
Wrap around and around to make a big messy middle on the charm. Repeat for as many skull charms as you want.
The bead charms are just a little different. Make your double loop. Thread the long end of the wire through a bead . Wrap the wire around the bead, back to the middle and make your messy pile. Take care to tuck the end of the wire in as close as you can with needle nosed pliers so it won't snag your clothes
Cut a ten inch length of stretchy bead string. Lay out it out with your charms on one side and several possible bead choices on the other side. This makes it easy to begin stringing the bracelet. It takes me many tries to get the look the I want at a length that works, so don't be disappointed if you don't get it just right the first time.
This is how the knot should be tied, according to the the stretchy string people.
Bats in the Belfry Choker
Along the same lines as the sugar skull charms, you can draw funky skulls and bats to make into charms. I used permanent markers on the white shrink plastic and opaque gel pens on the black shrink plastic for the bats. The pictures below show the size of the skulls and bats when I cut them out and their size after baking. You can get a variety pack of shrink plastic that includes the white, black, brown and frosted shrink plastic for about $5 at Michael's. Don't forget to punch holes before baking and spray with sealer after.


For the choker I used glass candy corn beads and strung the whole bunch on on purple wire. I made loops on the ends of the wire and tied bits of black cord and purple and orange ribbon to tie around the neck. I left several inches in front, fraying the black cord and then added some shorter pieces of the ribbons. I braided the long ends to make them easier to tie.

Saturday, October 10, 2009

Needle Felted Pumpkin


I'm doing an online class through Joggles.com. It's a needle felted pumpkin class! I just finished the first lesson and it was awesome!
The instructions are easy. There are plenty of pictures so you know what your wool should look like at each step.
The only draw back is that you don't know what the cost of supplies will be when you buy the class. The supply list is emailed to you one week before the class begins. Joggles.com sells the supplies, sometimes as a class kit. The kit for this class cost as much as the class. In my case, the kit was the best option because I have no knowledge of felting. But I might not have signed up for the class had I known the cost in advance.
Anyway, it is very cool and I can see all kinds of applications for needle felting.

Tuesday, October 6, 2009

Terrorific Tuesday Week 1

terrorific-tuesday-2009-wee

Studio Mama Blog
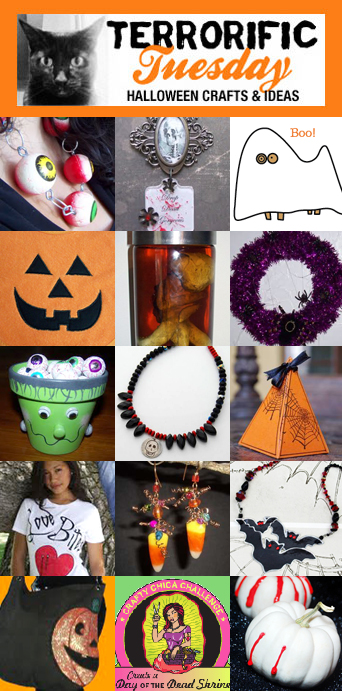
Creep out your friends with this Leatherface-esque collection of eyeballs strung on hardware!

The Impatient Crafter
Halloween is right around the corner and Madge kicks off the season with a stunningly spooky mixed media necklace and a bonus short story sure to send shivers up your spine!

Living Locurto
Kids will love dressing up this cute doggie in different costumes with this Halloween Doggie Dress-Up Free Printable!

Sharron Westerfield
Create an adorable jack-o-lantern baby bib for your favorite little one!

Crafterella
Join Crafterella in making you own spooky Mantipi specimen jar (with tutorial) using polymer clay.

The Fearless Crafter
Welcome your guests with this cute and creepy Spooky Spider Wreath wreath!

My Big Mouth
Craft a mini Halloween candy dish that looks like Frankenstein

Strands of Beads
Melissa creates a simple skully necklace to celebrate the season.

Kate Pullen, the Rubber Stamping Guide at About.com
Create a Halloween pyramid box perfect for use as a Halloween favor box or as an unusual decoration.

Allee Marderosian for iLoveToCreate
Take your look to the Darkside with these Twilight Romance tees, perfect for Halloween festivities or everyday adventures!

Candace Jedrowicz - Spirit Clay
These sparkly Candy Corn Riot earrings are made using real candy corn! No kidding!

Brenda Pinnick
Brenda uses her Sizzix Die to create a batty neck piece you'll want to sink your teeth into!

The Impatient Crafter for iLoveToCreate
Madge shows you how to make a super cute Halloween tote in this week's I Love to Create post!

Crafty Chica
The Chica, ILoveToCreate & Craft Zine have teamed up for a skullerific Dia de los Muertos Shrine Contest!

Alexa Westerfield a.k.a. Swelldesigner
Inspired by her love for True Blood, Swelldesigner takes a stab at bloody white pumpkins!

Sunday, October 4, 2009

Logan Canyon


My honey and I took a drive up to Logan Canyon today. We were told the colors would be fabulous this weekend. We were not disappointed. We just didn't know where we would end up.


It turns out, we came out at the top of the mountain in the snow.
It was beautiful! The road ended at Bear Lake in Raspberry, Utah. We decided to drive around the lake instead of going back through the canyon.
That drive took us
through corners of Idaho and Wyoming and back down over another snowy mountain and into the Ogden Valley.
At one point we had to stop for a couple of cowboys trying to move their herd across the canyon road. The cows were boisterous and misbehaving. Finally one of the cowboys hollered obscenities at the last misbehaver and they were all across the road in a hurry.
No telling where we'll end up next Sunday.

Thursday, October 1, 2009

Candy Corn Riot Earrings

These fun funky earrings are made with real candy corn!

I love the smell of candy corn! It's the smell of autumn for me. I got the idea to try this 15 years ago, and I still have the original pair. They are quick and easy to make, but you'll need several hours to condition the candy corn. Here's what you'll need to make these earrings:
  • Candy Corn (about $1.50 for a bag)
  • 1 Spool of 24 Gauge Wire , any color (about $1.30 for 17 yds)
  • 1 Pair of Earring Wires (about $1.30 for 6 pair)
  • Tacky Glue (about $2.50 for 4oz)
  • Assorted Beads
  • Any Kind of Acrylic Spray Sealer (about $2.50)
  • Small Wooden Skewer
Joanns has the next three tools for $20 in a pack
  • Needle Nose Pliers
  • Round Nose Pliers, the Wooden Skewer can be used in place of these
  • Wire Cutters, or Old Craft Scissors
1 Place several candy corns on a newspaper and in a well ventilated area spray them lightly with sealer. Let dry completely. Turn the candy corn over and repeat. Turn and repeat. Turn and repeat...You get the idea. You'll want to coat each side ten or more times. If you try to spray a heavy coat of sealer, the colors will run, so patience is key.

2 Cut about 2 inches of wire for each piece of candy corn. Fold about one third of the wire over the wooden skewer. Use the long end to wrap around the short end, keeping the short piece as straight as possible. What you end up with looks something like a screw with eye at the top.

3 Put a drop of Tacky Glue on the end of the eye screw and screw it gently into the top of the candy corn. You may also want to put a tiny drop of glue where the eye meets the candy corn. Let dry overnight, if you can. You should be able to give the wire a gentle tug and have no movement.

4 Now comes the fun part! Cut a three inch length of wire. Make a loop around the skewer not quite in the middle and don't twist it. Choose an accent bead and slide it on the wire. Now make a loop on the other side of the bead.

5 Slide the candy corn onto one of the loops and holding the loop with needle nose pliers, twist the straight end between the loop and the bead. Twist at least twice, then cut off the what's left sticking out.

6 Cut five 5 or 6 inch wire pieces. Choose one accent bead per wire. Thread one wire at a time through the loop below the bead. Slide the bead on and give the wire one complete twist so it won't work itself out of the loop.

7 Holding the wire on the bead side close to the pointy end of the skewer, wrap the wire around the point to make a coil. Slide it off and repeat with the other end of the wire. I repeated this with three different colored beads on the loop.

8 Slide the untwisted loop onto the loop of an earring wire and holding the untwisted loop with needle nose pliers wrap the end around to close it. add two more beaded wires and wrap the ends on the skewer point. The coiled wires can be arranged any way you like for maximum bling.


September Snow, no kidding!


Yesterday afternoon, my husband and I took a drive into the Ogden Valley. We could tell that the rain we'd had in the morning had brought snow to the upper elevations of the Wasatch range. The old road to Snow Basin (I posted photos from that road a few days ago) was was getting a dusting of snow. It made the autumn colors that much more brilliant! This is twenty minutes from our house!
Everyday is a surprise here. I so miss my friends in Maryland, but I am awestruck by my new home. It is bittersweet.