It's Day 5 of The Smeared and Smudged 31 Days of Halloween Blog Hop!
Below are all the fabulous bloggers:
Terra,Tori,Kristy,Kapree,Alison,Christine,Kelli,Windy,Susan,Alex,Monique,Jane,Sugar,Black Dragon,Lisa,Shell,Jean,Julia,Jennifer,Loren,Christy,Vee,Lady Brayton,Lindsay,Little Black Kitten,Celeste,Leigh,Pam,Donna,Valerie,Helen,Sharon,Lisa,Karen,Carolyn,Pam
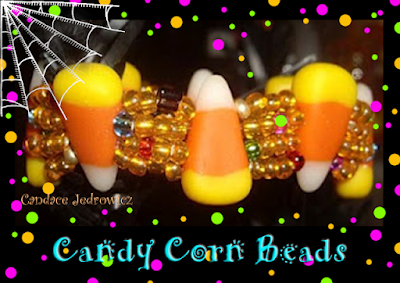
I love October. The colors and smells of autumn bring my senses to life. I love to bury my nose in the first bag of candy corn I buy in October. I open it with relish and pour it into a clear glass candy jar. That's when it's fall to me! Three years ago I went to Italy with three friends to take polymer clay jewelry classes with Louise Fisher Cozzi and Donna Kato. We had so much fun! Louise taught us how to achieve an amazing technique to give polymer clay layers of color. She uses translucent polymer clay and colors it with oil paint. After it's cured, she adds more oil paint on top of that. After that's dry, she uses color pencils to give the piece another layer of fabulous color.
Here I've started conditioning translucent polymer clay. After the clay is fairly soft you can add a tiny bit of oil paint. An inexpensive oil paint is fine.


 Continue to condition until the clay is a uniform color. It helps to have a piece of the candy corn to look at while you're tinting the clay.
 Be sure to add only a dab of paint each time, and do the yellow before the orange. It's okay to get yellow paint on your orange clay, but not okay to get orange paint on your yellow clay.
The orange roll will be the largest, the yellow is half as large as the orange and the white roll is half as large as the yellow.
Lay the rolls side by side and slice evenly.
Begin by rolling the white piece into a cone, the orange piece an egg shape and the yellow piece into a slightly flattened oval.
Gently roll the pieces until the all edges touch and it looks like a continuous cone shape.
Flatten the cone shape slightly. It's a good idea to have that candy corn to look at for dimension.

For the bracelet beads, bend a wire or paper clip to mark where the holes will be.
I made mine to mark both holes just inside the orange part. For earring beads, you might want to make a vertical hole through the candy corn.
Remember to hold the clay very gently as you pierce it, so you don't squish it.
Bake the clay as directed on the package.
When making a bracelet, I line my beads up against a ruler to make it seven inches long.
The length you use depends on who the bracelet is for. I wanted this bracelet to look full, so I used three strings in each bead hole and strung smallish beads.
Larger beads would make it look chunky, if that's your preference.


Fabulous! I was almost thinkin' this was real candy corn. Yumbo! xxD
ReplyDeleteHahahaha! Gotcha!
DeleteWow that is really awesome, I dont have the patience for stuff like that. Yours is beautiful!
ReplyDeletePeace,
Kristy
Thank you Kristy!
DeleteSuper cute bracelet!! LOVE the candy corn beads!! Thanks for the tutorial!!
ReplyDeleteyour candy canes look so YUMMY!!. So real :).
ReplyDeletethank you so much!
DeleteAwesome beads and bracelet, My Queen of Halloween! I must say I adore the hat you are wearing in the video. I never would have thought to use a pumpkin in that way :) You are one inspiring lady! Too bad we are not neighbors...you could teach me all types of crafting lovelies :)
ReplyDeleteThe pumpkin is one of my crowns, M'Lady. I so wish we were neighbors! =0)
DeleteWOW!! Those beads look so amazing real. Yummy!.. Thank you for sharing your talent.
ReplyDeleteThank you!
DeleteCandace, even though my clay work has pretty much stopped, a class in Italy with Danna Kato makes me drool. I spent a week with her at a retreat in Detroit and she is fun! I make a candy corn cane -easier but your pieces are spectacular.
ReplyDeleteHey, thanks! I'd love to see your canes!
DeleteYUM...that candy corn looks good enough to eat!! I love how you always SHOW us how to make whatever amazing art you have made. Thank you!!!
ReplyDeleteHappy Haunting,
Regi
Thank you, Regi!
DeleteYour bracelet is awesome
ReplyDeleteHugs xxx
this looks so yummy, very beautiful
ReplyDeleteGreat idea and your step by step is very nice
ReplyDeleteThank you Lisa!
Deleteawesome tutorial and wonderful art.
ReplyDeletesusan s.
Thanks!
DeleteAwesome creation!
ReplyDeleteThanks for sharing your talent with us!
Hugs,
Julia
OMGOSH...these look good enough to eat...YUM!! You are so talented and so inspiring..thank YOU!!
ReplyDeleteHappy Hauntings,
Regi^_^
I so thoguht those were real candy corn when i first saw the pic! Fabulous job and thanks for the step by step pics :)
ReplyDeleteFABULOUS - this is pure genius :-)
ReplyDeleteHey, thanks! That means so much to me!
DeleteFab tutorial, love those candy corn beads
ReplyDeleteLindsay xx
Hey thanks, Lindsay!
DeleteOh what a great idea - thanks for sharing how you made this in detail. The candy corn looks good enough to eat!
ReplyDeleteThank you, my dear!
DeleteFabulous Bracelet and so cool that you made your candy corns for it! Thanks for sharing the How To's! You Rock! Hugs!
ReplyDeleteThank you so much, Sara!
DeleteWhat a fabulous bracelet! Love it xx
ReplyDelete